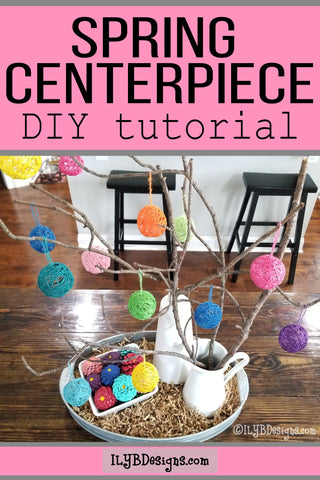
Spring Centerpiece DIY Tutorial
••••••••••••••••••••••••••••••••••••••••••••••••
It's so rewarding when an idea you have for a project turns out exactly as what you had envisioned!
This spring centerpiece idea was a result of me loving the Easter centerpiece I previously created as a request from one of my sweet friends and Keep Calm and Craft On group members. (If you're not already a member, check it out and join by clicking on the link.)
This is how the original Easter centerpiece turned out.

It all started by finding an inspirational photo on Pinterest for an Easter centerpiece and finding what I already had around my house that I could use to create my own version.
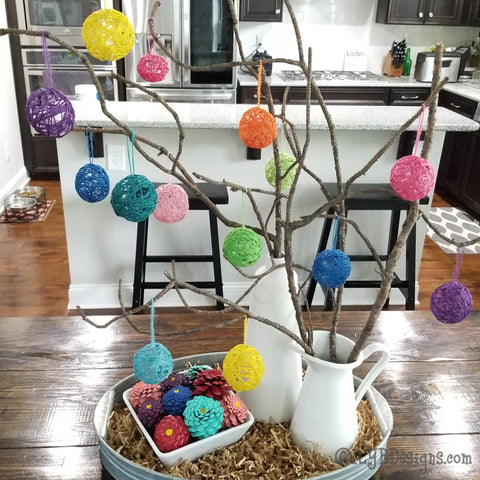
I gathered a galvanized tray from my coffee table, a bunny basket, Easter eggs, Easter grass, 2 white vases, and my boys found some really awesome sticks from outside. The hardest part was stringing the Easter eggs to hang on the branches. It literally took about 30 minutes from start to finish!
I was so happy with how it turned out, that I decided I was keeping it up long after Easter. So, it's been 2 weeks since Easter and after searching Pinterest for some more inspiration, I came up with an idea for a spring version of this centerpiece that can stay put for a while now.
WHAT YOU WILL NEED:
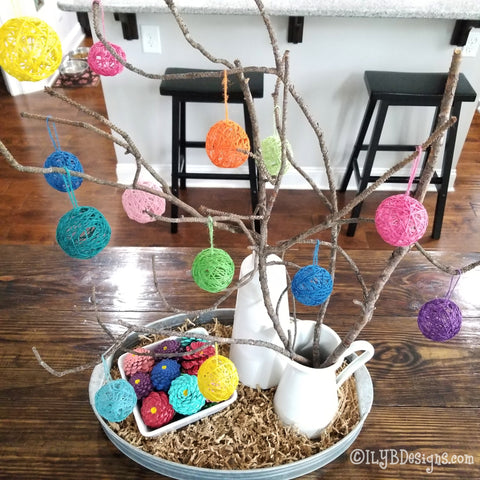
There are actually 2 craft projects involved in getting this centerpiece look - Zinnia Flower Painted Pinecones and Jute Twine String Balls. So I split this centerpiece project up over 2 days.
Many of these materials you may already have around your house...use what you have! The only thing I had to order was the colored twine. I had everything else from other random projects in the past.


Note: This post contains affiliate links. By clicking on them and purchasing products through my links, I may receive a small commission for qualifying purchases (at no additional cost to you).
- pinecones
- acrylic paint or spray paint
- paint brushes
- colored jute twine
- white liquid glue (I used Aleene's Tacky glue, but Elmer's school glue or Mod Podge will work too)
- balloons (I used water balloons because they are smaller)
ZINNIA FLOWER PAINTED PINECONES
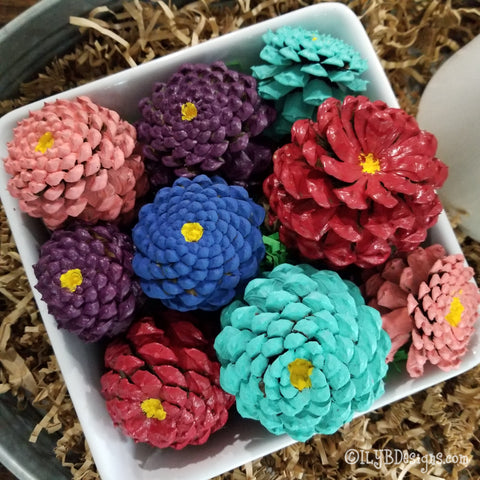
Who knew you could paint the bottom of pinecones and they turn into beautiful Zinnia flowers!
They look a lot different than when I first gathered the pinecones from around my house! I was a little worried mine would not turn out as pretty as what I had seen on Pinterest because the only pinecones I could find looked like these...

But that's ok!
This project ended up being a little science lesson with my boys since they were helping me gather the pinecones. I kept telling them those weren't the kind I was looking for because I wanted the opened pinecones with a bigger bottom to them to become the flower petals of the painted pinecones.
Quickie science lesson: Little did I know that since the pinecones we were finding had freshly fallen from the trees, they were closed up to hold the seeds inside and were full of moisture. It's not until the pinecones warm up and dry out that they open up to release the seeds to germinate and we see the beautiful pinecones I wanted to work with.
With a little research, I discovered that to get the pinecones to open up AND kill any little bugs that may be lurking inside of them, all you have to do is heat them in the oven.
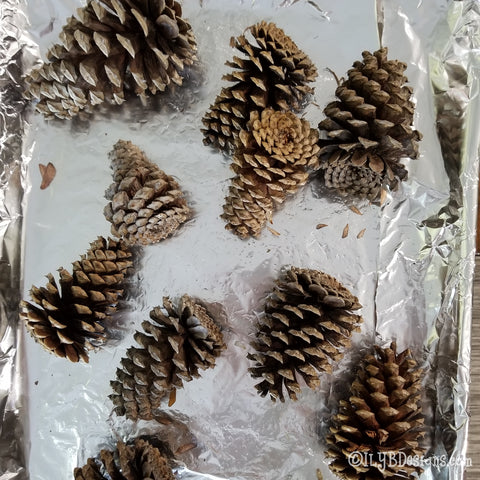
I covered a cookie sheet with aluminum foil so any sap would not leak out and ruin my cookie sheet. It also catches the little seeds that pop out as they open up. I heated the pinecones in the oven at 250 degrees for about an hour or so. Keep a close watch on them to be sure they do not burn. (The time may vary, just keep them in there until they open up all the way.)
Now, the fun part...painting!
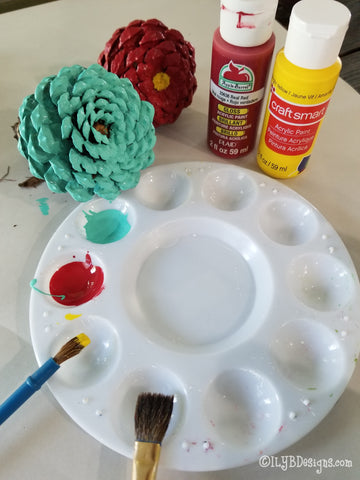
You can use acrylic paints and paint the bottoms of the pinecones OR you can spray paint them. Since I already had various colors of acrylic paints on hand, I painted them with a brush. I recommend a wide, flat brush to make the painting go quickly. You only have to paint halfway down the pinecone because that is all that you will see when you cluster them in a bowl. (I didn't even paint the underside of the "petals". It's not necessary since it won't be seen.)
The acrylic paint dries pretty fast. Don't forget to add the yellow center to your Zinnia flower to complete the look!
JUTE TWINE STRING BALLS
This is the most time-consuming and messy part of the centerpiece, but it's so worth it! Look how pretty they are!

I ordered a pack of colored jute twine from Amazon that contained springy colors.
Blow up balloons to the size you want your twine balls to be. I wanted mine relatively small, so I used water balloons. I made 14 balls that vary in size from about 2"-3". You may need more or less depending on the size you want your final centerpiece to be.

In a small disposable cup or bowl, mix equal parts white liquid glue and water. Stir it until smooth and runny. Now get ready to get messy! Be sure to cover your work area to catch the glue mess that is about to happen. (There's no way to do this neatly...I tried several ways and they were all messy!)
Randomly wrap the twine around a balloon until you get the look you want to create (this is just to get the twine to the right length before you glue it to the balloon, so don't worry about it being perfect now). Cut your twine piece when you get the look you're going for.
Now, take that piece of twine and stick it in the cup of glue to get it all soaked. Wrap the soaked twine around the balloon again, but this time it's going to stay wrapped, so now's the time to make sure it looks how you want it to. I recommend running the twine through your finger and thumb as you wrap it to help squeeze off the excess glue. You want the twine wet with glue but not dripping.


You will need to have a place to hang your wrapped balloons overnight while they dry. Be sure to cover the area underneath where they are hanging to catch any wet glue that may drip. I had a wire basket that I turned upside down and used clothespins to hang the balloons from their ends.


After about 12 hours, they will be completely dry and hardened. Pop the balloon and you will have to poke it some to completely detach it from the twine. Hold on to the tie of the balloon so it doesn't fall inside the twine ball (trust me...it's hard to get out if you accidentally let go).
Then string a fresh piece of twine through an opening in the ball to create a hanger for each ball. Now they're ready for hanging!

All that's left is to put your centerpiece together. Cluster your flower pinecones in a bowl or basket and hang your colored jute twine string balls on the branches. You now have a beautiful spring centerpiece!!!
Did you like this tutorial? Pin it for later using the image below. Check out my other blogs for more ideas and don't forget to join my Facebook group, Keep Calm and Craft On for more DIY ideas along with FREEBIES for being a member.
Leave a comment